Most dentists identify as scientists rather than artists.
But dentistry, particularly in cosmetic and restorative practices, requires today’s clinicians to tap into their inner Michelangelo. That rings especially true in the case of shade selection.
The Shade Selection Challenge
The marriage of science and art is most prevalent when choosing the perfect shade for a patient’s crown, bridge, or other permanent restorations.
Restorations must be functional, through application of dental science, as well as beautiful, with a natural appearance that blends undetectably with the rest of the patient’s dentition.
Recent Article: All About the All-on-4® Screw-Retained Prosthesis
Perfect shade selection for porcelain, zirconia, e.max, and other materials is a skill every dentist must refine.
Accurate shade matching for tooth-colored restorations is not easy. The patient’s age, skin and lip tone, disease state, medication side effects, and dentin color all influence shade matches … not to mention environmental factors, such as colors in the room and available light.
The Solution
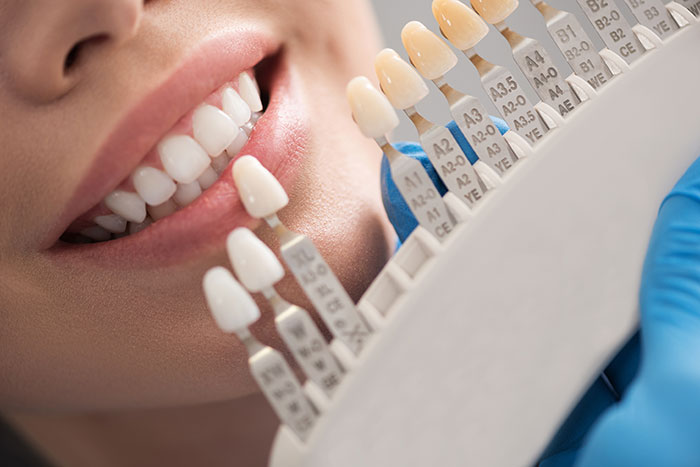
The most common system of shade selection is the tabbed shade guide.
Tabbed shade guides provide a wide spectrum of hue (color), value (lightness or intensity of the hue), and chroma (saturation or dominance of the hue). And, they’re very affordable.
However, traditional shade guides come with disadvantages.
These include: The subjectivity of shade selection; the influence of environmental conditions, such as room light quality; and their tendency to deteriorate due to frequent exposure to disinfectant chemicals.
Shade Selection Tips
Even with all of their drawbacks, shade guides are indispensable tools for today’s dental practice.
Before using them, ask your patient if he/she uses any whitening products. If so, wait seven-to-fourteen days after bleaching to pick a shade.
Recent: How to Choose the Right Posterior Crown
Here are ten more helpful shade selection tips:
- Select the shade at the start of the appointment before the tooth dehydrates during treatment. Desiccation affects value, chroma, and translucency of the tooth.
- Polish extrinsic stains from the tooth and adjacent teeth.
- Cover the patient’s clothing with a gray bib. Remove lipstick and any other distracting makeup. Wear natural-colored gloves.
- Turn off the unit’s light. Make initial selections under incandescent or fluorescent lighting; then, move the patient near a window.
- View the tooth at eye level standing 10–14 inches away. Moisten both the teeth and the shade tab.
- Hold the shade tab with its incisal edge abutting the incisal edge of the tooth.
- Make selections quickly. First impressions are the most accurate.
- Before retinal fatigue sets in, choose the closest two shades. Rest your eyes by looking at a gray or pale blue surface for a few seconds. Then look back at the tooth, and pick from the first two shades selected.
- Use natural light with the chair facing a window, if possible, for the final shade selection. Light quality has been shown to be the most influential factor in selection of accurate shades.
- Have more than one person assist with shade selection. Consider letting the patient participate in the process, and document the choice in the record.
The Future of Shade Selection
Advanced technology in colorimetry allows for a much more reliable method of shade selection.
For example, the use of digital cameras provides better communication of accurate shade selections between you and your dental lab. Other more expensive devices include colorimeters and spectrophotometers.
Digital shade-selection devices eliminate subjectivity, provide results that can be reliably duplicated, and offer better quality control.
Related: The Future of Technology in Dentistry
However, as with anything else, limitations exist. They include: Edge loss, inadequate translucency mapping, technique sensitivity, and cost.
Working With Your Dental Lab
Accurate communication with your lab technician ensures that the restoration comes back to your office with the perfect shade.
Be sure to include the shade guide manufacturer’s information on the prescription form when you send it. And, whenever possible, include digital photos with shade-mapping to accompany the lab orders.
Also, when setting up the camera shot, hold the shade tab next to the tooth to be matched. Make sure that the tab number is visible in the photograph.
Successful dental restorations must not only be functional, but also esthetically pleasing. Selecting the correct shade using knowledge of hue, value, and chroma calls for an artistic eye and a systematic process.
Use the tips in this article to help reduce remakes due to inaccurate shade selection.
Here at First Choice Dental Lab, our team of experienced technicians will assist you in improving your shade selection skills. Also, we’ll provide you with clear, accurate communication to achieve patient satisfaction for every case.
Ready to get started? Contact us today at 1-866-791-7025, or complete the form below to request a fee schedule!
It’s time give your patient a reason to smile!
Bibliography
http://medcraveonline.com/JDHODT/JDHODT-02-00072.pdf
https://www.ncbi.nlm.nih.gov/pmc/articles/PMC3010031/